Need to connect to PPTP VPN on your Mac? Apple removed the built-in support for PPTP VPN connections in 2016. But there is an easy way to use PPTP VPN on your Mac that doesn't require you to keep using an older macOS version.
Read on for more details on how to set up PPTP VPN on your Mac or, if you already have a VPN Tracker account, get started right away with the VPN Tracker PPTP configuration assistant.
How to connect to PPTP on Mac?
What you need:
- The IP address or host name of your VPN gateway
- The remote network range you want to connect to via VPN
- A VPN client (VPN Tracker is the only VPN client to support PPTP connections on newer macOS versions)
Good to know: VPN Tracker works with all leading gateway manufacturers and, thanks to the PPTP configuration assistant, allows you to set up a PPTP VPN connection in seconds.
Download VPN Tracker
To start setting up your PPTP VPN connection, you need to install VPN Tracker on your Mac and create a free account:
You are now ready to start using the PPTP configuration assistant to set up your PPTP VPN connection.
Using the PPTP Configuration Assistant
With the PPTP VPN configuration assistant in VPN Tracker, you can set up a PPTP connection to use on your Mac in just 3 simple steps. Here's how it works:
Step one: VPN Gateway information
Open the PPTP configuration assistant. Under "Address", enter the WAN IP address or host name for the device you are connecting to.
If you aren't sure, you can usually find this in the main network overview page of your device's user interface.
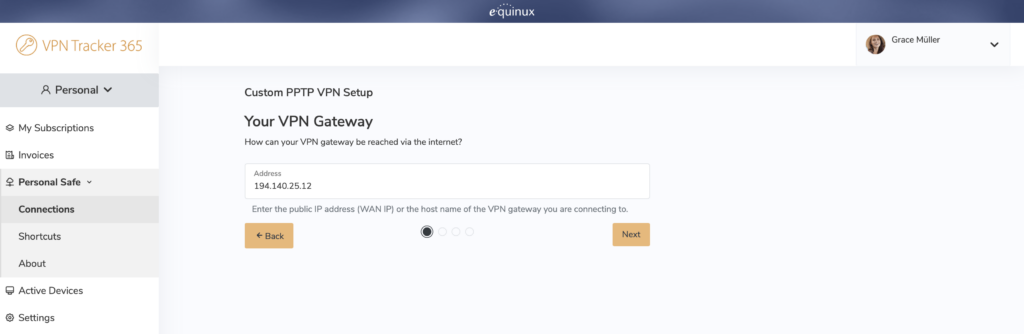
Enter your gateway's IP address or host name
Step two: Remote network settings
In the next step, you need to determine how your VPN traffic will be handled.
Host to everywhere
If you simply want all internet traffic to be tunnelled through the VPN, select "Host to Everywhere" from the dropdown menu and proceed to the next step:
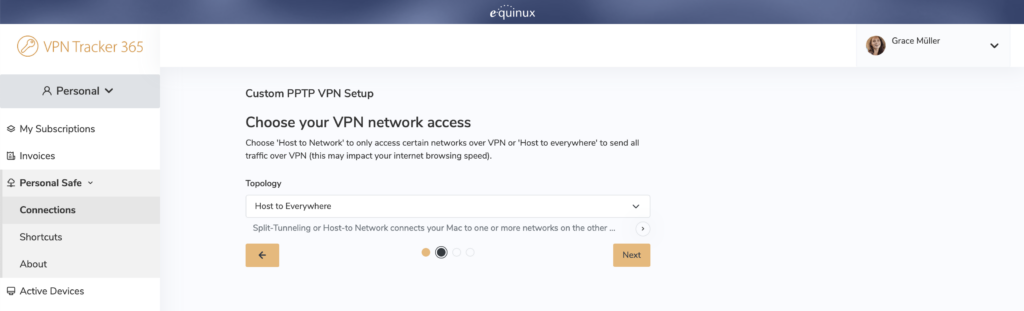
Choose host to everywhere to route all network traffic through the VPN
"Host to everywhere" can impact your internet connection speed. It may also cut you off from network resources such as printers, file servers, databases, etc. in your local network while connected.
Host to network
Alternatively, you can configure so-called "split tunneling" and determine exactly which network to access over the VPN.
To do this, choose "Host to Network" from the dropdown and enter the IP address of the remote network you want to connect to:
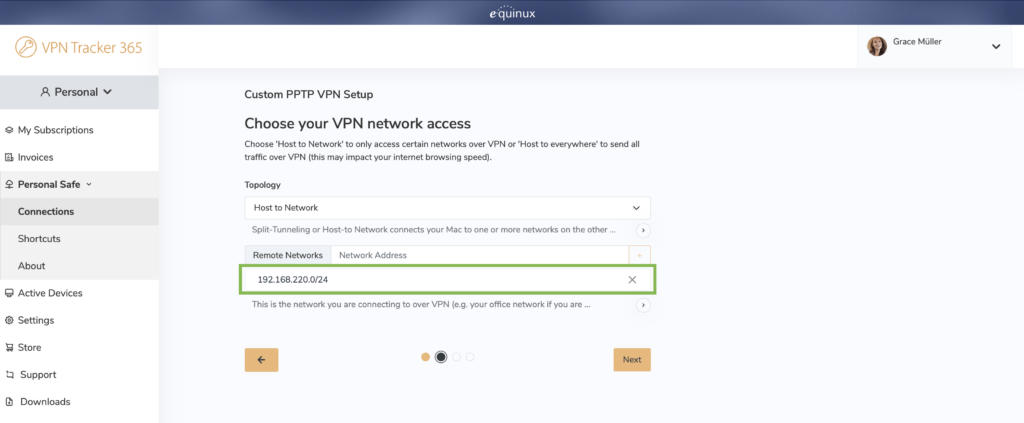
Enter your remote network to set up split tunneling for your connection
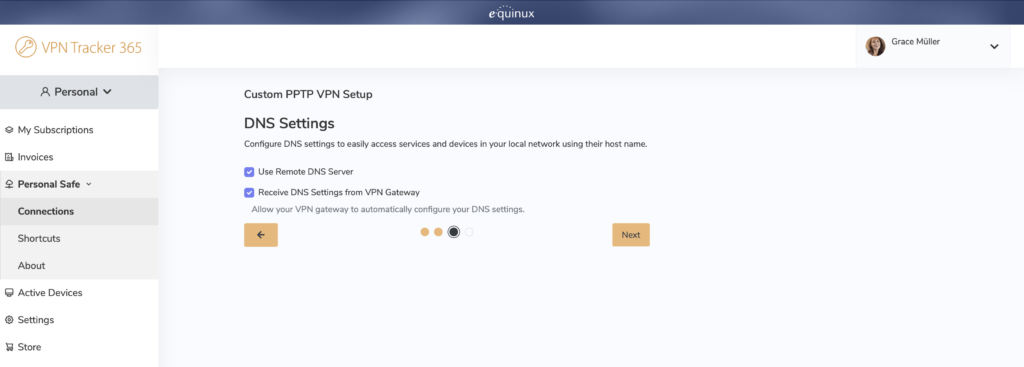
Step three: DNS settings (optional)
Next you will be given the option to configure DNS settings for your connection. This step is optional.
If you want to use DNS, check the box "Use remote DNS server".
Do I need to configure DNS settings for my connection?
If you only access things on your network using IP addresses (e.g. "192.168.1.4"), you can skip this step. If you access services using a hostname (e.g. "intranet.greenhaven.net"), you'll need to configure DNS.
Check the box "Receive DNS Settings from VPN Gateway" to automatically adopt your gateway's settings for the connection.
Check these options to adopt the DNS settings configured on your VPN gateway
Important: If you check this box, please ensure you have configured DNS on your gateway. If not, you will not be able to reach websites and other services.
Alternatively, uncheck this box and enter your DNS server and search domains in the fields provided:
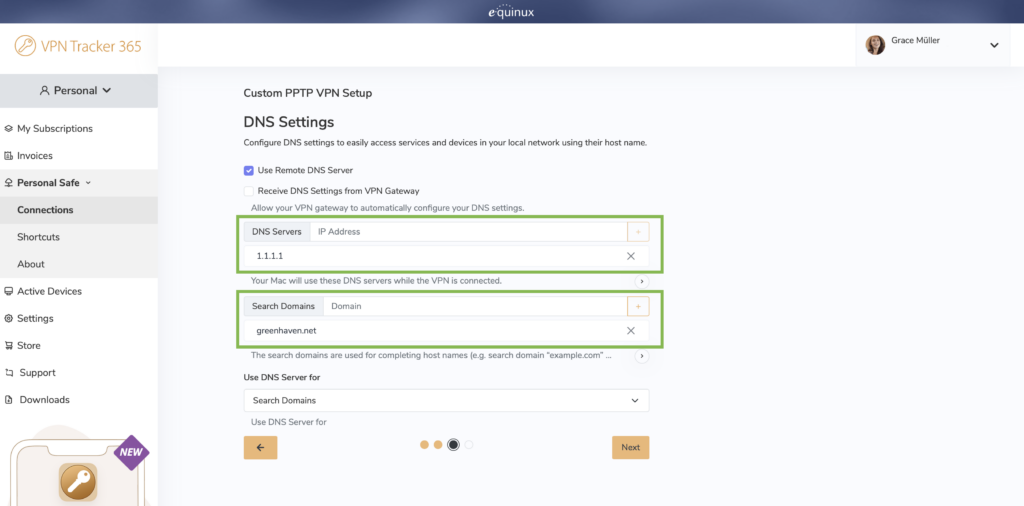
Add custom DNS settings for your VPN connection
In the final dropdown, it's important to distinguish between whether the connection uses DNS only for search domains (i.e. your internal host names) or for all domains (public and private.) If you select all domains and find yourself unable to access regular internet websites, you can always go back and update the configuration to only use your specific search domains.
Tip: If you are unsure about your DNS configuration, please reach out to your network admin for advice or uncheck the box "Use remote DNS server" and move on to the final step.
Connect to PPTP VPN
Once you've completed the steps in the guide, click "Create connection" to save your new connection to your account using secure end-to-end encryption.
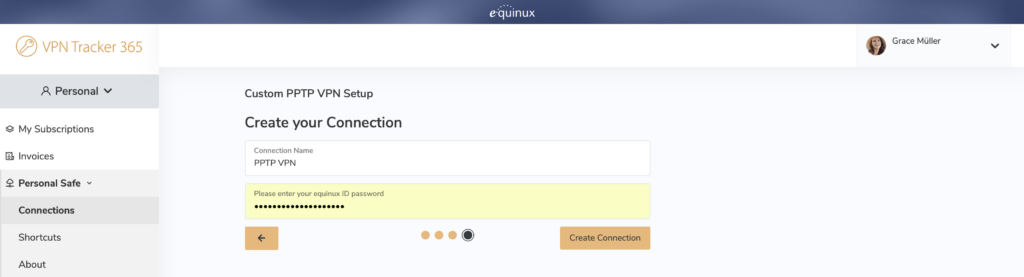
Save your connection using secure end-to-end encryption
You can now connect to PPTP VPN on your Mac! Switch back to the VPN Tracker for Mac app to access your new connection.

